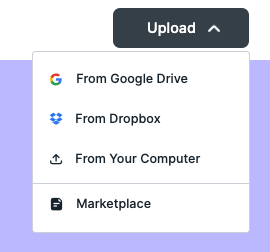
To begin, click the Upload button located in the top-right corner of the page. Then, choose the location where the document is currently saved from the dropdown menu.
 Then, select
who needs to sign the document.
Then, select
who needs to sign the document.
-
- Only Others - other people can sign the document and you will be able to view and track the document.
- Me & Others - you and other people can sign the document. Choose who needs to sign the document.

Option 'Only others':
- Click Only others.
- Select Sign at the same time if the signers will sign simultaneously or Sign in order if the signers will sign in a specified order.

- Add the email address of the signer(s) by clicking Add Signer.
- Type in their email address on the search box and select the contact that appears below.
- You may add multiple email addresses if the document is required to be signed by multiple people.
- Click Done when you’re finished.

- Then, click Next.
- Now, select the due date for the document. This acts as a deadline for the signers. On the chosen date, if not completed, the document cannot be signed anymore. Once finished, click Next.

- If there are any fillable fields, you may assign the fields that are required to be completed by your chosen signer.

- If there are any fillable fields, you may assign the fields that are required to be completed by your chosen signer.
- If there aren't any fillable fields, you may proceed and use your mouse to create the signature field.

- If you have multiple signers, make sure to assign each signer their designated fields by selecting the appropriate signer from the right-hand side before allocating the fields.

- Then, click Apply at the bottom of the screen.

- Double-check the allocated field(s), and then confirm this action by clicking Apply in the modal that pops up.

- Then, click Next.
- Review and prepare to send the document.
- You have the option to personalize the subject line for the email notification that will be sent to your signer(s) in the Email subject field.
- You also have the option to include a personalized message in the Email message field.

- Finally, click Send.
Option 'Me & others':
- To add other signers with yourself, click Me & others.
- Then, click Add signer.
- Select Sign at the same time if the signers will sign simultaneously or Sign in order if the signers will sign in a specified order.

- Your email address will be added automatically. To include additional signers, enter their email addresses in the search box and select the corresponding contacts from the dropdown list. Once you have added all necessary signers, click Done to finalize your selection.

- You can include up to 20 email addresses if the document needs to be signed by several individuals.
- Then, select the due date for the document. This acts as a deadline for the signers. On the chosen date, if not completed, the document cannot be signed anymore. Once finished, click Next.

- If there are any fillable fields, you may assign the fields that are required to be completed by your chosen signer.

- If there are any fillable fields, you may assign the fields that are required to be completed by your chosen signer.
- If there aren't any fillable fields, you may proceed and use your mouse to create the signature fields.
- Use your mouse to create the signature field - as shown below, then click the area.

- Make sure to select the correct signer from the left-hand side before assigning them their respective fields, ensuring that each signer is matched with the appropriate area to complete.

- Then, click Apply at the bottom of the screen.

- Double-check the allocated field(s), and then confirm this action by clicking Apply in the modal that pops up.
- Then, click Next.
- Review and prepare to send the document.
- You have the option to personalize the subject line for the email notification that will be sent to your signer(s) in the Email subject field.
- You also have the option to include a personalized message in the Email message field.
- Finally, click Send.